
Wiring a single light switch is an excellent basic electrical practice most people experience while upgrading or installing any light fixture, especially while changing an old or installing a new single-pole light switch. Not only will learning the single-pole light switch wiring diagram satisfy your curiosity in understanding how your lighting circuit works but it will also provide valuable knowledge for properly wiring a one-pole light switch.
Understanding the Basics of a One Light Switch Wiring Diagram
Before getting into details about wiring, there is a point that should be understood as to what this one light switch wiring diagram signifies. This kind of diagram, in most cases, explains the wiring of an on/off switch that controls just one light fixture. Also, it is mostly known as a single pole switch. This is one of the most basic electrical connections.
The Fundamentals of the Circuit
Components that are available can be understood by referring to the procedure of wiring. Summary in brief
Power Source: For a common house, it is located at your electrical panel. For North America, the voltage is about 120V
Switch: A common single pole switch has two terminals to which the wires have to be attached and then there is a ground terminal.
Light Fixture. This is a light that this switch will flip the switch and turn on.
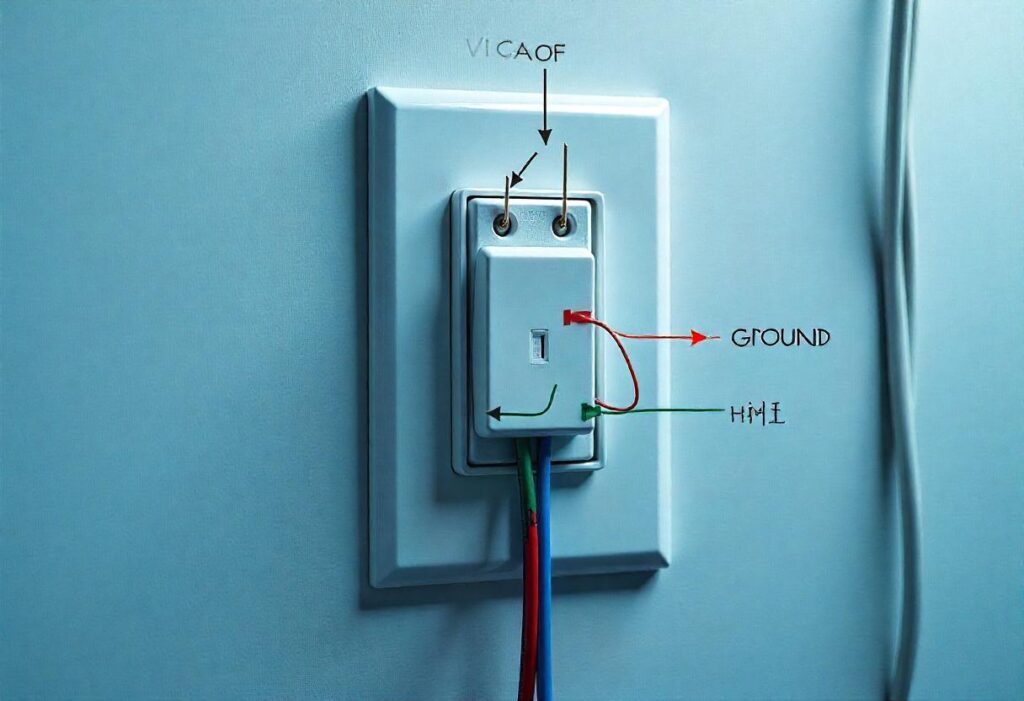
Wiring. These are basically cables, but most often connected, which is an non-metallic sheathed cable typically called Romex. The latter has three insulated wires. To be specific the color coding typically involves black wire for the hot condition, white usually represents neutral wires, and naked copper represents grounds.
Terminology used at one light-switch wiring diagram:
Some helpful words before starting wiring include the hot wire (Black) as being the carrying source of the electric current from the power source into the switch then the light fixture and neutral wire as White is a wire used in the electric circuit that provides completion by giving the electrical return current to the panel.
Ground Wire (Bare Copper or Green): It is done for safety measures, as it doesn’t allow an electric shock; instead, the stray electric current finds its pathway in case of a fault.
How to Connect a Single Light Switch: Step-by-Step
Get a feel of each component and major words, followed by step-by-step instructions on the wiring of one pole switch in great detail. Every step should carefully be followed through as follows;
Step1: Switch Power OFF
You would ensure that the power was switched off at the breaker box before you began to work on the electrical system so you presented no opportunity for a possibility of electric shock due to your working on the wiring.
Step 2: Understand Your Wiring Choices
The wiring configuration will depend on whether your circuit is receiving power. There are two main choices:
- Power to the Switch First: In this type, the “hot” wire is a straight shot to the source of power to the switch. Then the other wire carries the power from the switch to the light fixture.
- Power Comes to the Light Fixture First: In this scenario, the “hot” wire is a direct lead from the power source to the light fixture. And the switch in between, actually breaks the circuit between the power source and light.
In short words, it will be considered that the power comes to the switch first, which is the majority of the cases.
Step 3: Connect Wires to the Switch
Follow these steps, making sure the power is off and the wiring is exposed:
- Connect the Hot Wire: Connect the black wire of the power source to the first terminal of the switch.
- Connect the Hot Wire: Using another black wire, connect the other terminal of the switch to the light fixture. This wire will carry the power to the light.
- Neutral Wire: This white wire is to be attached directly to the light fixture and not to the switch.
- Grounding the Circuit: The bare copper or green wire has to be attached to the ground terminal of the switch. Now the same ground has to be connected to the light fixture’s ground terminal. A metal box will also need grounding.
tep 4: Finalize the Circuit
After tightening the wires, check off the following
Tighten all the screws to hold it firmly in place
Check all the connections to confirm no bare wires and loose screws are present.
Mount the switch on the wall box with screws that hold it in place. Step 5: Test Connection
Now that everything is wired and installed, it’s time to test the switch. Turn the power back on at the breaker box, and flip the switch. If everything’s wired right, the light will turn on and off as expected.
Common Exceptions in the Wiring Procedure
Though the above steps will serve most cases, there may be slight variations between installations. For instance:
- In most countries, color may vary: Research your local electrical code for using color for some wiring.
- Where switches are to be located: If it’s far from the source or light, the wiring becomes more extensive, with junctions to accommodate an extended span of wiring.
Important safety tips when wiring a light switch
Electrical work can be very dangerous. In case you are a first-time electrical worker, or even when you’re unsure of what is to be done, the best is to hire a licensed electrician. In case you have confidence in your DIY skills, here are the most basic safety tips:
- Always Turn Off Power: That can’t be repeated enough. You should switch off the breaker before working on any wiring.
- Check Local Codes: Any electrical work will have to conform to local safety codes, including the National Electrical Code (NEC) for the United States. These local codes ensure the installations are safe and reliable.
- Use Proper Tools: High-quality tools, like wire strippers, screwdrivers, and a voltage tester, can prevent accidents.
- Do Not Overload Circuits: Never attach a light switch to carry more amperage than it is rated for. Overheating may be the result, and it may lead to electrical fires.
Finding Diagrams for Reference
If you are seeking pictures to use as a guide for your wiring project, here are some references:
- Google Images: Simply type in “single light switch wiring diagram” and you will find many diagrams and step-by-step instructions.
- DIY Websites: Family Handyman and This Old House offer pictures and guides on how to do this.
- Books: Hardware stores have books on home improvements and libraries along with detailed wiring diagrams and safety measures.
Also Read : SG Analytics: Harnessing the Power of Data to Business Growth
Conclusion: Learn the Single Light Switch Wiring Diagram
Single pole light switch wiring seems overwhelming. However, you will master a DIY job of wiring if you are given the right tools, information, and precautions. Knowing one light switch wiring diagram will have you in control of your electrical projects-from replacing a faulty switch to installing a new light fixture. Don’t forget to remember: safety first, follow local building codes, and call an electrician if unsure.
You can now safely and effectively wire a single-pole light switch to your home with confidence by following this guide and making use of the accurate diagrams.